How to Send and Receive Crypto Safely

How to Send and Receive Crypto Safely
You've just bought your first Bitcoin or Ethereum, and now you want to send it to a friend, move it to a hardware wallet, or deposit it on an exchange. But as you stare at that long string of characters - the wallet address - you might feel a twinge of anxiety. What if you make a mistake? What if you send it to the wrong address?
Here's the good news: sending and receiving cryptocurrency safely isn't complicated once you understand the process. Think of it like sending a package through the mail - you need the exact address, the right carrier (network), and proper labeling (memo/tag). With a systematic approach and attention to detail, crypto transfers become straightforward and routine.
This guide will walk you through every step of safely moving your digital assets, from understanding why these precautions matter to executing transfers with confidence. We'll cover network selection, address verification, test transactions, and all the safeguards that protect your funds. If you're completely new to cryptocurrency, consider starting with our Crypto for Beginners guide to build a solid foundation first.
Why Safe Transfers Matter
Unlike traditional banking where you can call customer service to reverse a mistaken transfer, cryptocurrency transactions on a Blockchain are permanent and irreversible. Once a transaction is confirmed on the blockchain, there's no "undo" button - no bank to call, no fraud department to intervene. This finality is by design and is part of what makes crypto powerful, but it also means that mistakes can be costly.
Understanding this reality isn't meant to scare you, but rather to emphasize why following a careful process matters. Here are the key reasons why safe transfer practices are essential:
Irreversible Transactions: Unlike bank wires that can sometimes be recalled, blockchain transactions are final. If you send funds to the wrong address, they're likely gone forever. There's no central authority to reverse the transaction.
Network Compatibility Matters: Different blockchains use different address formats and token standards. An ERC‑20 token (like USDT on Ethereum) can't be sent to a BEP‑20 address (USDT on BNB Smart Chain), even though they're both called "USDT." These networks are like different postal systems - sending a USPS package to a FedEx address won't work.
Memo/Tag Requirements: Some networks, like XRP, XLM, and certain BNB addresses, require an additional memo or tag when sending to exchange wallets. Think of it like an apartment number - without it, your package arrives at the building but can't be delivered to the right unit. Missing this detail can strand your funds.
Security Threats: The crypto space attracts scammers who use sophisticated tactics like phishing, address poisoning (where fake addresses appear in your transaction history), and fake support teams. Staying vigilant is crucial. We cover these threats in detail in our guide: Crypto Scams: How to Spot and Avoid Them.

Prerequisites: Setting Up Your Security Foundation
Before you send or receive any cryptocurrency, it's essential to have your security basics in place. Think of this as checking your car's brakes and seatbelt before a road trip - you want everything working properly before you start moving.
Secure Your Wallet Setup
If you're holding significant amounts of cryptocurrency, a hardware wallet is your best defense against online threats. These physical devices keep your private keys offline, away from hackers and malware. As a general rule: if you can't afford to lose it, secure it with a hardware wallet. For smaller amounts you use frequently, a reputable software wallet is fine, but understand the trade-offs. For a complete guide on wallet types, security practices, and storage options, see How to Safely Store Your Cryptocurrency.
Backup Your Recovery Phrase
Your seed phrase (recovery phrase) is the master key to your wallet. If you lose your device but have your seed phrase, you can recover everything. If you lose both, your funds are gone forever. Here's how to protect it:
- Write it down physically (pen and paper) or engrave it on metal for fire/water resistance
- Create multiple backups (2 minimum, 3 preferred) and store them in separate, secure locations
- Never store it digitally - no photos, no cloud storage, no password managers
- Never type it into any website or share it with anyone
- Test that you can restore from your backup before you need to
Keep Everything Updated
Just like your phone or computer, wallet software and firmware need regular updates to patch security vulnerabilities. Set a reminder to check for updates monthly, and always update before making large transfers.
Exchange Security (If Using Custodial Services)
If you're using an exchange for either sending or receiving, take these precautions:
- Enable Two-Factor Authentication (2FA) using an authenticator app (like Google Authenticator or Authy), not SMS
- Set up withdrawal address whitelists so only pre-approved addresses can receive your funds
- Enable withdrawal delays or holds when available - this gives you time to cancel if your account is compromised
- Don't withdraw immediately after changing security settings - wait through the platform's cooling-off period
If you're new to exchanges or want to understand how they work, including fees and minimums, check out our guide: Understanding Crypto Exchanges.
The Safe Way to Send Crypto: Your Step-by-Step Guide
Following a consistent process every time you send cryptocurrency is the key to avoiding costly mistakes. Whether you're sending to a friend, moving funds to cold storage, or depositing on an exchange, use this systematic approach. It might seem like a lot of steps at first, but with practice, it becomes second nature - and it could save you from losing funds.
Step 1: Identify the Exact Asset and Network
This is where many mistakes happen. Cryptocurrencies can exist on multiple blockchains, and they're not interchangeable. For example, USDT exists on Ethereum (ERC‑20), BNB Smart Chain (BEP‑20), Tron (TRC‑20), and other networks. These are completely separate - you can't send ERC‑20 USDT to a BEP‑20 address.
What to do:
- Match the token and chain precisely. If you're sending "USDT on Ethereum," make sure both your wallet and the recipient support Ethereum (ERC‑20).
- Never assume compatibility. An Ethereum address (starting with 0x) won't work for Solana, XRP, or Bitcoin - each has its own address format.
- Verify that both your sending wallet and the receiving platform support the exact network you've chosen. For exchange deposits, the deposit page will explicitly list which networks are supported for each asset. Don't assume - verify.
- If the network isn't listed on the deposit page, don't send to it. The funds may be irretrievable.
- When in doubt, ask the recipient to confirm which network they're using.
Step 2: Collect Recipient Details from the Source
Always get the address directly from the source - never trust addresses sent via email, text, or social media without verification. Scammers often intercept communications to swap in their own addresses.
What to do:
- Copy-paste the address directly from the recipient's wallet app or the exchange's official deposit page.
- Prefer scanning QR codes when possible - this eliminates typing errors entirely.
- If the destination requires a memo/tag (common for XRP, XLM, ATOM, and BNB Beacon Chain when sending to exchanges), copy both the address and memo/tag exactly. Treat them as equally important.
- For receiving crypto: When someone is sending you crypto, share the correct address, network name (e.g., "Ethereum ERC‑20"), and any required memo/tag. Make it clear which is which. Most wallets and exchanges can generate QR codes that include both address and memo/tag. Never share seed phrases or private keys - you only need to share your public address to receive funds.
Step 3: Validate the Address Format and Double-Check Characters
Each blockchain uses a specific address format. If the format doesn't match what you expect, something's wrong. This is like checking that a mailing address has the right format before sending a package.
Common formats:
- Ethereum/EVM chains: Start with "0x" followed by 40 more characters (42 total)
- Bitcoin: Can start with "1" (legacy), "3" (P2SH), or "bc1" (bech32)
- Solana: Base58 encoding, typically 32-44 characters
- XRP: Starts with "r" or "X"
What to do:
- Verify the format matches the network you're using.
- Double-check address characters: verify the first 6 and last 6 characters of the address match what the recipient provided. Even one wrong character means your funds go to the wrong address - and you'll never see them again.
- For extra safety, read the address aloud or have a second person verify it.
- Be aware of "address poisoning" attacks where scammers send tiny amounts to addresses similar to your real contacts, hoping you'll copy the wrong one from your transaction history. Always verify addresses from the original source, not your history.
- If something looks off, stop and double-check with the recipient. It's better to ask than to lose funds.
Step 4: Add the Correct Memo/Tag When Required
Some networks require an additional memo or tag when sending to exchange wallets. This is like an apartment number - the address gets it to the building, but the memo gets it to the right account.
What to do:
- If the exchange deposit page shows a memo/tag field, copy it exactly along with the address.
- Double-check that you've entered it correctly - missing or incorrect memos can delay or prevent crediting.
- If you forget the memo, contact the exchange's support immediately with your transaction ID (TXID), address, amount, and timestamp. Recovery isn't guaranteed and may require a fee, but it's worth trying.
Step 5: Review Fees and Speed Trade-offs
Transaction fees vary based on network congestion and how quickly you want the transaction processed. Understanding this helps you make informed decisions and avoid overpaying.
Bitcoin fees:
- Quoted in sat/vB (satoshis per virtual byte)
- Vary dramatically with network congestion
- For non-urgent transfers, wait for off-peak times (weekends or overnight UTC) to save significantly
- Use "low" or "medium" fee presets unless you need speed
- Consider using Replace-By-Fee (RBF) if available, which lets you increase the fee later if needed
Ethereum/EVM gas fees:
- Priced in gwei (1 gwei = 0.000000001 ETH)
- Under normal conditions in 2024-2025, 5-30 gwei is typical
- Can spike above 100 gwei during NFT mints, token launches, or network congestion
- Avoid "max fee" or "fastest" presets unless the transfer is truly time-critical
- Consider Layer 2 solutions (like Arbitrum or Optimism) for lower fees if the recipient supports them
Step 6: Send a Small Test Transaction First
This is your safety net. For any new destination, chain, or significant amount, send a small test first - typically 1-5% of the total amount you plan to send. This might seem like an extra step, but it's saved countless people from losing everything.
What to do:
- Send a small test amount that's meaningful enough to confirm the process works (including memos/tags if required) but not so large that losing it would hurt.
- Wait for the test to be confirmed and credited.
- Verify the recipient received it correctly.
- Only then send the remainder.
Why this matters: A test transaction confirms that addresses, networks, memos, and fees all work correctly before you risk the full amount. After your test transaction, wait for it to be fully confirmed before sending the rest. Different networks have different confirmation requirements - we'll cover this in detail below in the "Confirmations and Finality" section.
Step 7: Save Your Transaction Details
Keep records of every transaction. You'll need them for taxes, support tickets, and your own records.
What to do:
- Copy the transaction ID (TXID/hash) immediately after sending
- Take a screenshot of the send confirmation
- Save everything in a secure, organized folder (organized by year and chain)
- Consider using a portfolio tracker that automatically records transactions
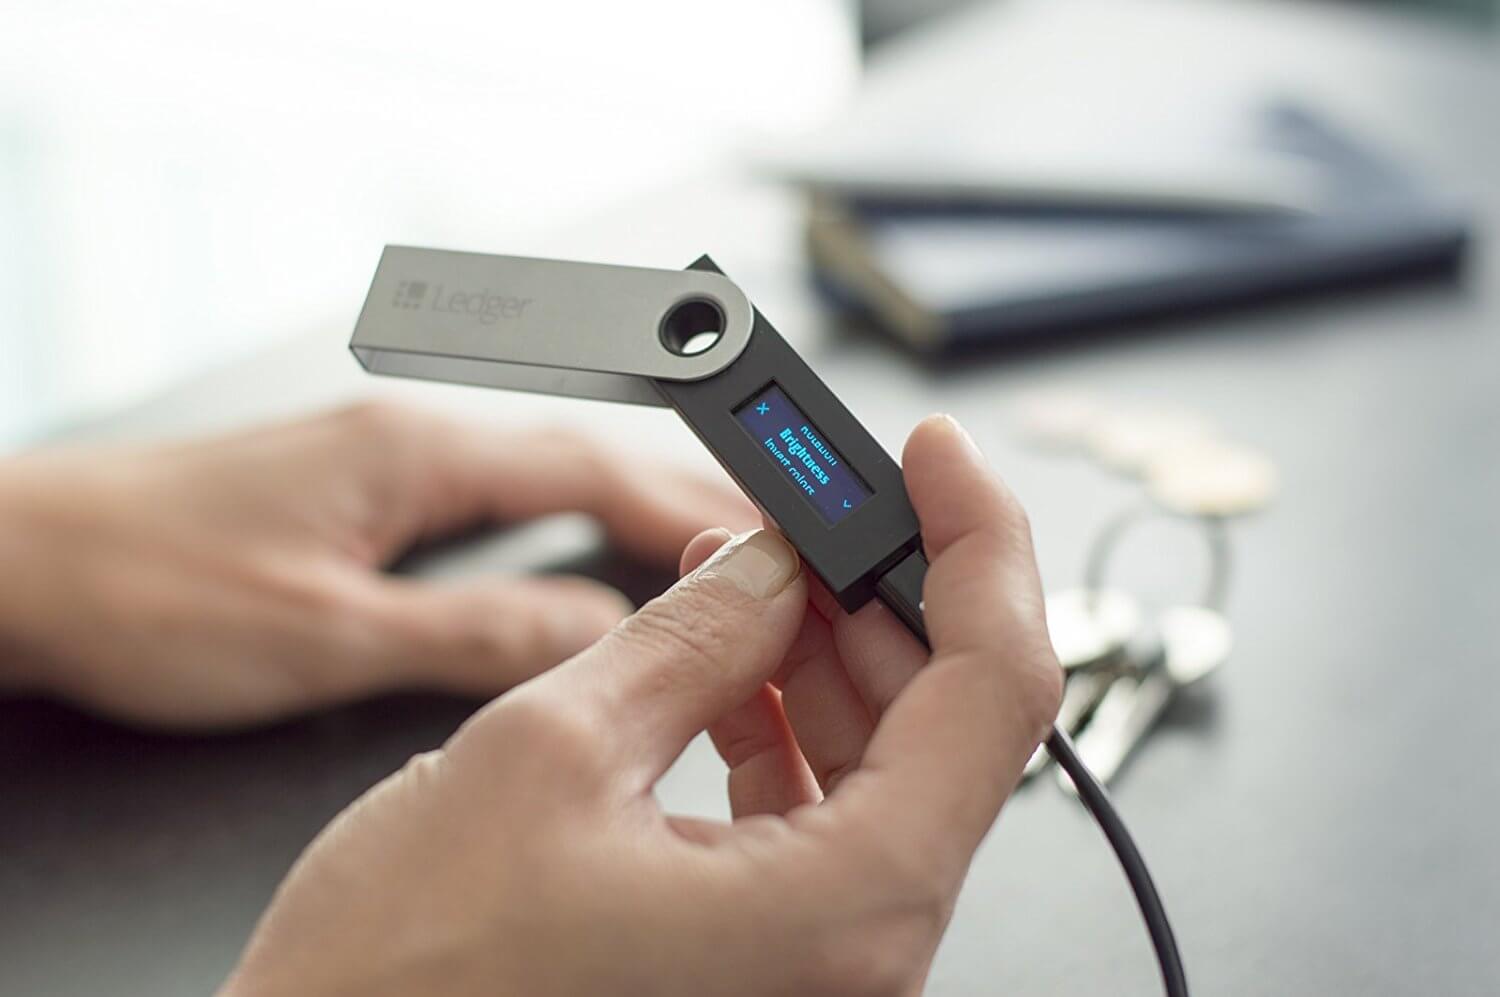
Sending To/From Hardware Wallets (Like Ledger)
Hardware wallets like Ledger and Trezor provide the highest level of security for your cryptocurrency by keeping your private keys offline. However, sending and receiving crypto with a hardware wallet involves a few additional steps compared to software wallets. Understanding these differences will help you use your hardware wallet confidently and safely.
Sending From a Hardware Wallet
When you send cryptocurrency from a hardware wallet, the process is similar to software wallets, but with an important security step: you must physically approve the transaction on the device itself.
The process:
-
Connect your hardware wallet to your computer or mobile device using the USB cable (for desktop) or Bluetooth (for mobile, if supported).
-
Open the wallet software (like Ledger Live, Trezor Suite, or MetaMask) and connect your device.
-
Enter the recipient address in the wallet software. You can type it, paste it, or scan a QR code.
-
Enter the amount you want to send and review the transaction details on your computer screen.
-
Verify on the device screen: This is the critical security step. Your hardware wallet will display the transaction details on its own screen. Always verify these details directly on the device, not just on your computer screen. Malware on your computer could alter what you see on the screen, but it can't change what's displayed on your hardware wallet.
-
Physically approve the transaction by pressing the buttons on your hardware wallet (usually both buttons simultaneously on Ledger, or the button on Trezor).
-
Wait for confirmation: The transaction will be broadcast to the network, and you'll see the transaction ID in your wallet software.
Important security tips:
- Always verify on the device: Never approve a transaction without checking the details on your hardware wallet's screen. The address, amount, and network should match exactly what you intended.
- Use test transactions: For large amounts or new addresses, send a small test first, just like with software wallets.
- Keep your device updated: Regularly update your hardware wallet's firmware to patch security vulnerabilities.
- Never share your PIN or recovery phrase: Your hardware wallet will never ask you to enter your recovery phrase on your computer - only on the device itself.
Receiving To a Hardware Wallet
Receiving cryptocurrency to a hardware wallet is actually simpler than sending - you just need to provide your receiving address. The hardware wallet doesn't need to be connected to receive funds.
The process:
-
Connect your hardware wallet and open the wallet software (Ledger Live, Trezor Suite, etc.).
-
Navigate to the asset you want to receive (e.g., Bitcoin, Ethereum).
-
Click "Receive" or "Get Address" in the wallet software.
-
Verify the address on your device: Your hardware wallet will display the address on its screen. This ensures you're getting the correct address and that your device hasn't been compromised.
-
Copy the address or share the QR code: You can copy the address from the software or share the QR code with the sender.
-
Share with the sender: Provide the address (and any required memo/tag) to whoever is sending you crypto.
-
Wait for the transaction: Once the sender broadcasts the transaction, you'll see it appear in your wallet software. You don't need to keep your device connected - the funds will be there when you check next.
Important tips:
- Verify addresses on the device: Always check that the address shown on your hardware wallet's screen matches what you're sharing. This protects against malware that might show a different address on your computer.
- Use fresh addresses: For privacy-focused coins like Bitcoin, your hardware wallet will automatically generate new addresses. Use the address it provides rather than reusing old ones.
- No connection needed: Once you've copied the address, you can disconnect your hardware wallet. The funds will arrive on the blockchain regardless of whether your device is connected.
Common Hardware Wallet Mistakes to Avoid
- Approving without verifying: Never approve a transaction on your hardware wallet without checking the details on the device's screen first.
- Skipping test transactions: Even with hardware wallets, always test with small amounts when sending to new addresses.
- Sharing recovery phrases: Your hardware wallet will never ask you to enter your recovery phrase on your computer. If any software asks for it, it's a scam.
- Not updating firmware: Outdated firmware can have security vulnerabilities. Keep your device updated.
- Using compromised software: Only download wallet software from official sources (ledger.com, trezor.io, etc.). Fake software can steal your funds even with a hardware wallet.
Remember: hardware wallets provide excellent security, but they're not foolproof. Always follow the same careful process - verify addresses, send test transactions, and double-check everything - even when using a hardware wallet.
Confirmations and Finality: How Long Is "Safe"?
Different networks secure transactions differently, so "safe" varies by chain and value:
-
Bitcoin: Uses Proof‑of‑Work. Wait for 3 confirmations (~30 minutes) for typical transfers, or 6 confirmations (~60 minutes) for high-value settlements. Learn more: What is Proof-of-Work (PoW)? and What is Bitcoin? A Beginner's Guide.
-
Ethereum: Uses Proof‑of‑Stake with finality. Transactions are typically finalized after ~12.8 minutes. Many wallets credit after fewer blocks for UX, but wait for full finality for large transfers. Learn more: What is Ethereum? A Beginner's Guide.
Practical guidelines:
- Low-value transfers: Trust after platform's stated threshold (often 1-2 confirmations)
- Medium-value transfers: Wait for standard confirmation (3 for Bitcoin, finality for Ethereum)
- Large transfers: Always wait for higher security standard (6 confirmations for Bitcoin, full finality for Ethereum)
- When in doubt: Align with the stricter party's policy
Sending To/From Exchanges and DEXs
Whether you're moving funds to an exchange to trade or withdrawing to your personal wallet, there are important differences between centralized exchanges (CEX) and decentralized exchanges (DEX) that affect how you send and receive.
Centralized Exchanges (CEX)
Centralized exchanges like Coinbase and Kraken act as custodians - they hold your funds in their wallets. When you deposit, you're sending to their address. When you withdraw, you're sending from their system to your address.
Key considerations:
-
Deposit pages are your guide: Each exchange has a deposit page for every asset they support. This page will show you:
- Which networks are supported (e.g., "Ethereum ERC‑20" or "BNB Smart Chain BEP‑20")
- The exact address to send to
- Any required memo/tag
- Minimum deposit amounts
- Estimated confirmation times
-
Withdrawal security: Before withdrawing from an exchange:
- Whitelist your withdrawal addresses (this prevents withdrawals to unauthorized addresses even if your account is compromised)
- Enable withdrawal holds or alerts so you're notified of any withdrawal attempts
- Don't withdraw immediately after changing security settings - wait through the platform's cooling-off period (usually 24-48 hours)
-
Fees and minimums: Exchanges publish their withdrawal fees and minimums per asset/network. These can vary significantly, so check before withdrawing.
Decentralized Exchanges (DEX)
Decentralized exchanges like Uniswap work differently - you trade directly from your own wallet. Your funds never leave your custody unless you explicitly approve a smart contract to interact with them.
Key considerations:
- You control your keys: Since you're trading from your own wallet, you maintain full control. However, this also means you're responsible for security.
- Smart contract approvals: When you use a DEX, you often need to approve the DEX's smart contract to spend your tokens. Be careful with these approvals:
- Review what you're approving before signing
- Periodically review and revoke unlimited token approvals, especially for contracts you no longer use
- Be especially cautious with newer or less-established DEXs
CEX-to-Wallet vs. Wallet-to-CEX Transfers
Withdrawing from CEX to your wallet (CEX → Wallet):
- This is where network confusion causes the most problems. Always verify the network you're withdrawing to matches what your wallet supports.
- The ERC‑20 vs. BEP‑20 confusion is a top cause of lost funds. Double-check: are you withdrawing to Ethereum or BNB Smart Chain?
- Start with a small test withdrawal if it's your first time using that network.
Depositing from your wallet to CEX (Wallet → CEX):
- Always start with a test deposit - send a small amount first.
- Verify the exchange credited the correct asset and network before sending the remainder.
- Keep the transaction ID in case you need to contact support.
Remember: exchanges are intermediaries. While convenient, they introduce counterparty risk. For long-term holdings, consider moving funds to a hardware wallet you control.
Common Mistakes to Avoid
The most critical mistakes to avoid:
-
Wrong network: Sending ERC‑20 tokens to BEP‑20 addresses (or vice versa). Always verify the network on the deposit page - tokens with the same name on different chains are not interchangeable.
-
Missing memo/tag: Forgetting the required memo/tag when sending XRP, XLM, ATOM, or BNB Beacon Chain to exchanges. Treat the memo/tag as equally important as the address.
-
Address poisoning: Copying addresses from transaction history instead of getting them directly from the recipient. Scammers send tiny amounts to similar-looking addresses hoping you'll copy the wrong one. Always verify addresses from the original source.
-
Phishing and fake support: Sharing seed phrases or private keys with anyone. No legitimate service will ever ask for these. If someone does, it's a scam.
Recordkeeping and Taxes
Keep records of every transaction for taxes, support tickets, and your own records. Save the transaction ID (TXID), screenshots of the send confirmation, and organize them by year and chain. Consider using portfolio trackers like CoinTracker, Koinly, or CoinStats that automatically track transactions and generate tax reports.
Tax note: Transfers between your own wallets are generally non-taxable, but fees can affect cost basis. Selling, trading, or spending crypto typically creates taxable events. Tax laws vary by country - for details, consult a tax professional and read our guide: Understanding Cryptocurrency Taxes.
Conclusion: Building Confidence Through Practice
Sending and receiving cryptocurrency safely might seem overwhelming at first, but with a consistent process, it becomes routine. The key is to slow down, verify everything, and never skip the test transaction for significant amounts or new destinations.
Remember: the blockchain's irreversibility is a feature, not a bug. It's what makes crypto powerful, but it also means that careful process matters. By following the steps outlined in this guide - verifying networks, checking addresses, sending test transactions, and keeping good records - you can transfer your digital assets with confidence.
Start small, practice with test transactions, and gradually build your confidence. Before you know it, these safety checks will become second nature, and you'll be able to move crypto safely without anxiety. The process might take a few extra minutes, but those minutes are worth it when they protect your hard-earned assets.
If you're new to cryptocurrency, continue building your knowledge with our Crypto for Beginners guide, and always remember: when in doubt, slow down, verify, and test first. Your future self will thank you.
*Disclaimer: The information provided here is for informational purposes only and does not constitute financial advice. Cryptocurrency trading involves risks, so please DYOR. For beginners, check out our Beginners Guides to learn more.